
Ever Wanted to Create Something Like This?
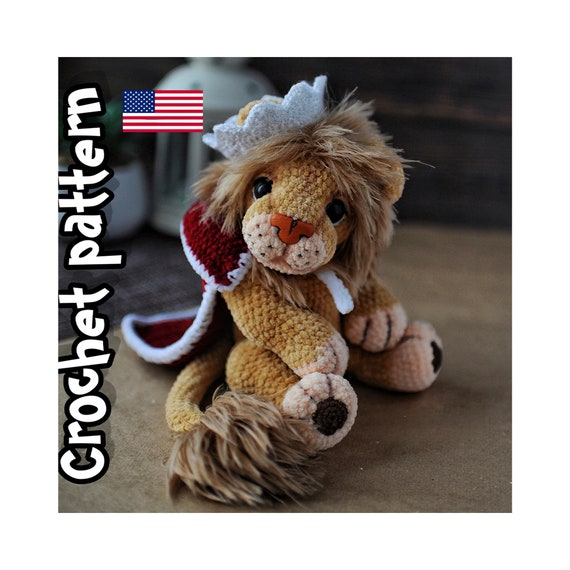
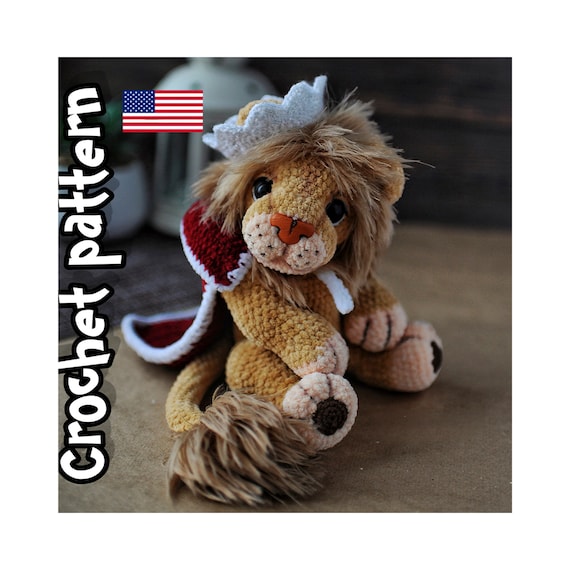
There’s something quietly satisfying about bringing a tiny kingdom to life with your hands: a plush little lion crowned in a handmade crown, seated like a storybook king on a nursery shelf. If you’re the kind of maker who loves cozy projects that double as thoughtful gifts, this crochet lion pattern is the kind of project that slows the world down and rewards you with a charming, durable toy that feels like a keepsake.
What You’ll Create
You’ll make a seated amigurumi lion with a textured mane, a soft cape, and a tiny crown—finished at about 11.8 in (30 cm) using the recommended yarns. The pattern focuses on a sculpted, expressive face, defined paws and a balanced build so the finished toy sits gracefully. Picture a storybook-style lion that fits a nursery, a baby shower table, or a handmade collection on a shelf. It’s playful, a little regal, and built to last.
Why This Pattern
This pattern is designed for makers who care about neat, sturdy results. It’s not just a list of stitches—ThreadTutorial’s PDF walks you through shaping and assembly so seams, paws and mane look intentional and cohesive. Key benefits:
– Detailed shaping guidance for a balanced, seated finish.
– Textured mane instructions that give the lion personality without complicated techniques.
– Practical assembly tips (joints, stuffing, and sculpting) so the toy holds up to handling and display.
– Storybook aesthetic that looks thoughtful as a nursery accent or special gift.
Who It’s For
This is an intermediate-level pattern. It’s perfect if you already know basic amigurumi techniques—single crochet, increasing/decreasing, basic assembly—and want to step up to a project with more shaping and finishing details. If you enjoy slow crafting, take pride in tidy stitching, and like projects that become keepsakes, this pattern will feel right. Note: the pattern does not include beginner crochet lessons.
What You Get
– A 39-page English PDF with clear, step-by-step instructions.
– Over 60 colorful close-up photos that show each stage.
– 16 clickable links to video explanations for tricky steps (click the blue-highlighted text in the PDF to view them).
– A complete materials and tools list: recommended yarns (Wolans Bunny Sweather, Himalaya Dolphin fine, Yarn Art Tango options), 2.5 mm and 2.0 mm hooks, safety eyes (18 mm), safety nose (25×15 mm), plastic toy joints for movable legs, stuffing, and assembly tools.
– Final size guidance and notes about variations depending on yarn and tension.
– Written by a human designer (not generated by AI) and intended for personal use—finished toys can be sold, but the pattern itself is protected.
How to Start
This is a digital product—no waiting for shipping. After purchase on Etsy you’ll see the instant download link in your order details once payment is confirmed. Download the PDF to any device, print or view it on a tablet while you work. The pattern uses USA crochet terms and assumes you’re comfortable with amigurumi basics, so gather your recommended supplies before you begin: yarn in main and accent colors, smaller hook for paw pads, safety eyes and nose, joints if you want movable legs, stuffing, and a sturdy needle for assembly.
If you like visual help, the 16 linked videos are an excellent way to confirm technique without hunting through forums. The photos and videos are made from real toys created from this pattern, so you’re following tested, clear guidance toward a predictable, lovely result.
Practical tips before you start: make a swatch to check tension and final size; choose safety eyes and noses appropriate for the intended recipient (especially for baby items follow safety guidelines); and keep a strong thread and wide-eyed needle handy for sculpting and secure sewing of joints.
👉 Explore more cozy DIY patterns at https://threadtutorial.etsy.com